
Thai Peanut Chicken Recipe With Creamy Heat
Thai peanut chicken captures bold flavors that satisfy cravings for something rich, savory, and just a little bit sweet.
The combination works beautifully whether you need a weeknight dinner or want to impress guests with minimal effort.
Every bite offers layers of taste that make ordinary meals feel special without requiring advanced cooking skills.
The creamy sauce paired with tender protein creates comfort food with an exotic twist that appeals to almost everyone at the table.
You can have dinner on the table faster than ordering takeout, and the results taste even better.
This dish has become a staple in many kitchens because it balances convenience with genuine deliciousness.
Why Thai Peanut Chicken Stays a Favorite
What Goes into Thai Peanut Chicken
Protein Base:Flavor Enhancers:Sauce Components:Finishing Touch:Thai Peanut Chicken Tools For Flavorful Stir-Frying
How to Prepare Thai Peanut Chicken
Chop Chicken
Grab your chicken breasts and slice them into bite-sized chunks that’ll cook quickly and evenly. Each piece should be roughly 1-inch square, which helps the chicken get perfectly golden and absorb all the delicious sauce.
Prepare Sauce Base
In a mixing bowl, get ready to create some magic with your sauce. Here are the ingredients to bring together:
Whisk everything until the mixture looks smooth and well combined.
Sear Chicken
Heat a large skillet to 375°F (190°C) and add a splash of neutral cooking oil. Spread your chicken chunks in a single layer, making sure they aren’t crowded. Cook for 6-8 minutes, flipping halfway through, until each piece turns a beautiful golden brown.
Combine Sauce and Chicken
Pour your prepared sauce directly over the seared chicken in the skillet. Stir gently to ensure every chicken piece gets a perfect coating. Let everything simmer together for 2-3 minutes so the flavors can mingle.
Finish and Serve
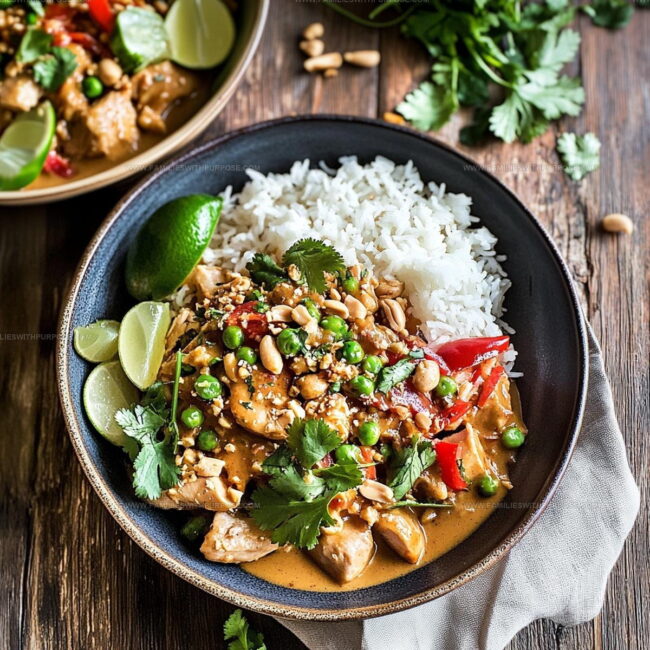
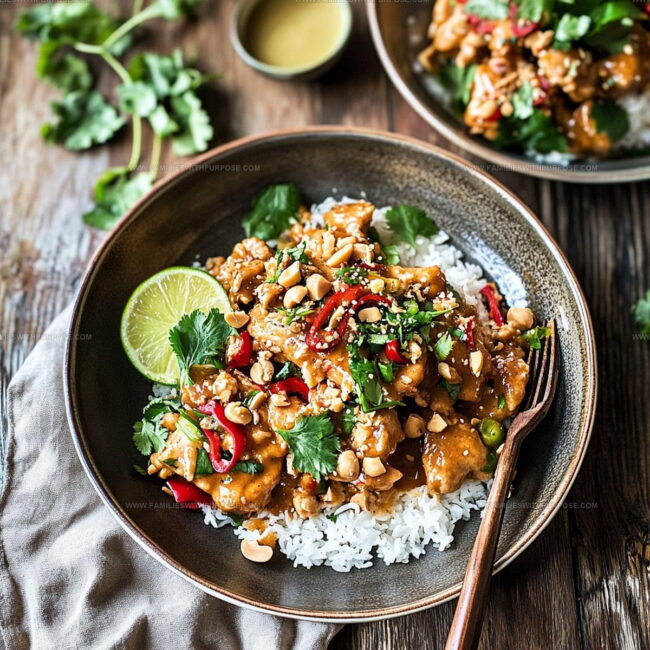
Sprinkle 1/4 cup freshly chopped cilantro over the top of the chicken. The herb adds a bright, fresh note that makes the entire dish pop. Serve hot over steamed rice or your favorite noodles.
Helpful Cooking Guidance for Thai Peanut Chicken
Flavor Options for Thai Peanut Chicken
How to Serve Thai Peanut Chicken
Keeping Thai Peanut Chicken Fresh
Thai Peanut Chicken Common Clarifications
Can I use a different type of nut butter?
Absolutely! Almond or cashew butter work great as substitutes if you don’t have peanut butter. The flavor will shift slightly, but the sauce will still be delicious.
Is this recipe spicy?
The basic recipe isn’t very hot, but you can add red pepper flakes or sriracha to boost the heat. Start with a small amount and adjust to your preference.
What if my sauce seems too thick?
No problem. Thin the sauce with a little extra coconut milk or water until you reach your desired consistency. Stirring carefully helps blend it smoothly.
Can I make this recipe ahead of time?
Yes, the chicken and sauce keep well in the refrigerator for 2-3 days. Reheat gently in a skillet to maintain the sauce’s texture.
Are there ways to make this dish healthier?
Definitely. Use skinless chicken breast, reduce the amount of peanut butter, and serve with cauliflower rice or zucchini noodles for a lower-carb option.

Creamy Thai Peanut Chicken Recipe
- Total Time: 18-21 minutes
- Yield: 4 1x
Description
Whipping up Thai Peanut Chicken brings comfort straight to your dinner table with rich, creamy peanut sauce coating tender chicken pieces. Spicy, nutty flavors dance across your plate, delivering a quick meal that feels like a tasty adventure from Southeast Asia.
Ingredients
Proteins:
- 1 lb boneless, skinless chicken breasts
Liquid/Wet Ingredients:
- 1 cup full-fat coconut milk
- ¼ cup low-sodium soy sauce
- 2 tablespoons lime juice
Aromatics and Seasonings:
- 3 cloves fresh garlic, minced
- 1-inch piece fresh ginger, grated
- ½ cup creamy peanut butter
- ¼ cup fresh cilantro, chopped
Instructions
- Slice 1 lb chicken breasts into uniform 1-inch bite-sized pieces, ensuring each chunk is roughly the same size for even cooking.
- Warm 2 tablespoons vegetable oil in a large skillet over medium-high heat (375°F) until the surface shimmers and looks slightly rippled.
- Carefully arrange chicken pieces in a single layer, avoiding overcrowding, and cook for 3-4 minutes per side until golden brown and internal temperature reaches 165°F.
- Combine ½ cup peanut butter, ¼ cup soy sauce, 1 cup coconut milk, 3 minced garlic cloves, and 1 tablespoon grated ginger in a mixing bowl, whisking until the mixture becomes completely smooth and uniform.
- Pour sauce directly over browned chicken, stirring gently to ensure each piece gets thoroughly coated with the creamy mixture.
- Reduce heat to medium-low (325°F) and simmer sauce with chicken for 2-3 minutes, allowing flavors to meld and sauce to slightly thicken.
- Remove skillet from heat and sprinkle ¼ cup freshly chopped cilantro across the top for a bright, herbal finish.
- Serve immediately over steamed jasmine rice or wide rice noodles, spooning extra sauce from the pan.
Notes
- Cut chicken into uniform pieces to ensure even cooking and prevent dry spots.
- Toast ground peanuts separately and sprinkle on top for extra crunch and nutty flavor.
- For a lighter version, swap chicken thighs with chicken breast and use reduced-fat coconut milk.
- Vegetarians can replace chicken with firm tofu, pressing it well before cutting into cubes to help it absorb the delicious sauce.
- Prep Time: 10 minutes
- Cook Time: 8-11 minutes
- Category: Sautéed
- Method: Sautéing
- Cuisine: Thai
Nutrition
- Serving Size: 4
- Calories: 464 kcal
- Sugar: 4 g
- Sodium: 490 mg
- Fat: 33 g
- Saturated Fat: 11 g
- Unsaturated Fat: 20 g
- Trans Fat: 0 g
- Carbohydrates: 13 g
- Fiber: 3 g
- Protein: 38 g
- Cholesterol: 85 mg
Mason Carter
Founder
Expertise
Family Meal Routines, Simple One-pot Meals, Budget-friendly Cooking, Quick Dinner Planning, Batch Cooking Systems
Education
- Certificate: Culinary Arts
- Focus: Training in core cooking techniques, kitchen operations, and real food preparation through hands-on experience in professional-style kitchens.
Penn Foster Career School (Online)Mason is the founder of Families With Purpose and the heart behind its simple, family-focused recipes. Based in Greenville, South Carolina, he creates meals that fit into busy routines and bring people back to the table. He focuses on easy dinners, one-pot meals, budget-friendly cooking, and practical weekly meal planning. Mason has built a recipe collection shaped by real family life, with clear methods and repeatable meals that work on everyday schedules.