
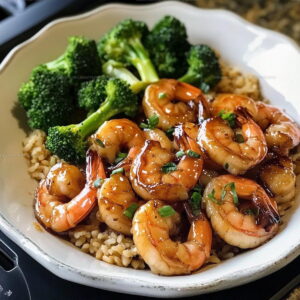
Honey Garlic Shrimp Recipe With Sweet Sticky Glaze
Honey garlic shrimp recipe delivers a meal that balances sweet and savory notes in perfect harmony.
Busy weeknights call for something quick yet impressive, and few options satisfy quite like succulent seafood coated in a glossy sauce.
What makes it so appealing is how effortlessly it comes together while still feeling special enough for company.
The combination works beautifully over rice, noodles, or alongside steamed vegetables for a complete plate.
Restaurant meals can be pricey, but preparing something similar at home saves money without sacrificing flavor.
Even picky eaters tend to clean plates when something so delicious lands in front of them.
Head to the full instructions below and see how simple creating something remarkable can be.
Top Reasons to Try 20 Minute Honey Garlic Shrimp
Complete Ingredient List for Honey Garlic Shrimp
Main Proteins:Sauce Ingredients:Cooking Enhancers:Garnish:Best Tools for Honey Garlic Shrimp
Quick Skillet Guide for Honey Garlic Shrimp
Prep the Shrimp
Grab a stack of paper towels and gently pat each shrimp until it’s dry. Getting rid of extra moisture helps the shrimp get that perfect golden sear.
Chop the Garlic
Peel those 3 garlic cloves and mince them into teeny-tiny pieces. The smaller you chop, the more flavor will spread through the dish.
Mix the Sauce
In a medium bowl, whip together these ingredients:
Whisk everything until it’s smooth and well combined.
Heat the Pan
Pour 1 tbsp olive oil into a large skillet. Crank the heat to medium-high and let it warm up for exactly 2 minutes.
Cook First Side
Spread the shrimp in a single layer across the hot pan. Make sure they’re not crowding each other. Let them sizzle for 2 minutes until they turn pink and start to curl.
Flip and Finish Cooking
Turn each shrimp over and cook for another 1-2 minutes. They should look completely pink and opaque when done.
Add the Sauce
Pour your honey garlic sauce over the shrimp. Stir quickly so every single shrimp gets coated in that delicious glaze.
Thicken the Sauce
Let the sauce bubble for 30-45 seconds. Watch as it starts to thicken and create a beautiful glaze on the shrimp.
Plate and Garnish
Transfer the shrimp to your serving plate. Sprinkle the top with:
Serve right away while it’s hot and the sauce is still glossy.
What Helpful Cooking Notes Perfect Honey Garlic Shrimp
Honey Garlic Shrimp Sauce Adjustments
Best Ways to Serve Honey Garlic Shrimp
Best Storage Method For Honey Garlic Shrimp
Honey Garlic Shrimp FAQs
Can I use frozen shrimp for this recipe?
Thaw frozen shrimp completely in the refrigerator, then pat them dry with paper towels to remove excess moisture before cooking.
How do I know when shrimp are perfectly cooked?
Shrimp turn pink and curl slightly when done. Avoid overcooking, which makes them tough and rubbery.
What if my shrimp are different sizes?
Adjust cooking time – smaller shrimp cook faster, larger shrimp need slightly more time. Watch for color change and curling.
Do I need to remove shrimp shells before cooking?
For this recipe, peeled and deveined shrimp work best. They cook more evenly and absorb the sauce better.
Can I make this recipe spicy?
Add red pepper flakes or a dash of sriracha to the honey garlic sauce for extra heat.
What kind of soy sauce works best?
Use regular soy sauce for balanced flavor. Low-sodium options work too if you’re watching salt intake.
Honey Garlic Shrimp Recipe
- Total Time: 11-12 minutes
- Yield: 4 1x
Description
Whipping up 20 Minute Honey Garlic Shrimp takes less than half an hour and delivers restaurant-quality flavor right to your dinner table. Succulent shrimp glazed with sweet-tangy sauce makes your weeknight meal feel like a special treat without complicated cooking skills.
Ingredients
Proteins:
- 1 lb shrimp
Sauces and Sweeteners:
- ¼ cup honey
- 2 tablespoons soy sauce
Seasonings and Garnishes:
- 3 cloves garlic
- 1 tablespoon olive oil
- ½ teaspoon salt
- ¼ teaspoon black pepper
- 1 tablespoon green onions
- 1 tablespoon sesame seeds
Instructions
- Blot the 1 lb of shrimp completely dry with paper towels to eliminate excess moisture for better searing.
- Finely mince 3 cloves of garlic into tiny, uniform pieces to distribute flavor evenly.
- Combine ¼ cup honey, 2 tbsp soy sauce, minced garlic, ½ tsp salt, and ¼ tsp black pepper in a medium bowl, whisking until smooth.
- Heat 1 tbsp olive oil in a large skillet over medium-high heat for exactly 2 minutes, creating a hot cooking surface.
- Arrange shrimp in a single layer across the skillet, ensuring no pieces overlap or crowd each other.
- Sear shrimp for precisely 2 minutes on the first side, watching for pink coloration and slight curling.
- Carefully turn each shrimp and cook an additional 1-2 minutes until completely pink and opaque throughout.
- Pour the prepared honey garlic sauce over the shrimp, quickly stirring to guarantee uniform coating.
- Allow sauce to simmer for 30-45 seconds, watching as it transforms into a glossy glaze around the shrimp.
- Immediately remove skillet from heat to prevent rubbery texture and overcooking.
- Transfer glazed shrimp to a serving plate with a slotted spoon to drain excess sauce.
- Sprinkle 1 tbsp chopped green onions and 1 tbsp sesame seeds across the top for fresh garnish.
Notes
- Pat the shrimp completely dry to help them get a gorgeous golden sear and prevent steaming instead of browning.
- Always cook shrimp in a single layer with space between them to ensure each piece caramelizes perfectly and doesn’t become rubbery.
- Watch the shrimp closely during cooking, as they go from perfectly done to overcooked in seconds, turning tough and chewy if left too long.
- Serve this dish immediately after cooking for the best texture and flavor, as shrimp can quickly become dense and lose their tender quality if left sitting.
- Prep Time: 5 minutes
- Cook Time: 6-7 minutes
- Category: Sautéed
- Method: Sautéing
- Cuisine: American
Nutrition
- Serving Size: 4
- Calories: 179
- Sugar: 10 g
- Sodium: 634 mg
- Fat: 7 g
- Saturated Fat: 1 g
- Unsaturated Fat: 6 g
- Trans Fat: 0 g
- Carbohydrates: 14 g
- Fiber: 1 g
- Protein: 18 g
- Cholesterol: 166 mg
Mason Carter
Founder
Expertise
Family Meal Routines, Simple One-pot Meals, Budget-friendly Cooking, Quick Dinner Planning, Batch Cooking Systems
Education
- Certificate: Culinary Arts
- Focus: Training in core cooking techniques, kitchen operations, and real food preparation through hands-on experience in professional-style kitchens.
Penn Foster Career School (Online)Mason is the founder of Families With Purpose and the heart behind its simple, family-focused recipes. Based in Greenville, South Carolina, he creates meals that fit into busy routines and bring people back to the table. He focuses on easy dinners, one-pot meals, budget-friendly cooking, and practical weekly meal planning. Mason has built a recipe collection shaped by real family life, with clear methods and repeatable meals that work on everyday schedules.