
Kansas City BBQ Mac Burnt Ends Recipe For Smoky Comfort
Kansas City BBQ mac burnt ends merge smoky, savory goodness with comfort food perfection.
Meat lovers and pasta enthusiasts will absolutely adore this mouthwatering fusion of classic barbecue and creamy macaroni.
Bold flavors explode in every single bite, creating a seriously satisfying meal that screams weekend celebration.
Southern-style cooking reaches new heights with this decadent dish that promises pure deliciousness.
Regional barbecue traditions shine through in this hearty recipe that transforms simple ingredients into something extraordinary.
Carnivores and cheese fans can rejoice over this incredible combination that proves mac and cheese can be seriously epic.
What Makes Kansas City Bbq Mac Burnt Ends So Bold
Kansas City BBQ Mac Burnt Ends Ingredient List
Main Proteins:Seasoning and Flavor Enhancers:Pasta and Creamy Components:Handy Kitchen Tools for Kansas City Bbq Mac Burnt Ends
Easy Way to Prepare Kansas City BBQ Mac Burnt Ends
Prep the Brisket
Grab your 2 lbs of beef brisket and trim off any extra fat. Chop it into neat 1-inch cubes so everything cooks evenly.
Season with Serious Flavor
Sprinkle your 1/4 cup bbq rub all over those beef cubes. Press that seasoning right into the meat – this is where the magic happens.
Get the Skillet Sizzling
Pour 2 tbsp olive oil into a cast-iron skillet and heat it up to medium-high. Your kitchen will start smelling amazing.
Sear Those Beef Cubes
Drop the seasoned cubes into the hot skillet. Let them cook for 2-3 minutes on each side until they develop those crispy golden-brown edges.
Slow Roast to Perfection
Transfer the seared cubes to a baking sheet. Slide them into an oven set at 275°F and let them cook for 2-3 hours. The meat will get super tender and caramelized.
Boil the Pasta
Cook 1 lb of elbow macaroni in salted water. Follow the package directions and drain when it’s perfectly al dente.
Craft the Cheese Sauce
Melt 1/4 cup butter in a large saucepan over medium heat. Here’s how you’ll build the sauce:
Whisk everything together until the sauce is silky smooth.
Combine Pasta and Cheese
Pour the hot pasta into your creamy cheese sauce. Stir until every noodle is coated.
Add the Burnt Ends
Gently fold those caramelized beef cubes into the mac and cheese. Make sure they’re evenly distributed.
Final Touches
Drizzle 1 cup bbq sauce over the top and sprinkle 1/2 cup chopped green onions for a fresh crunch.
Serve and Enjoy
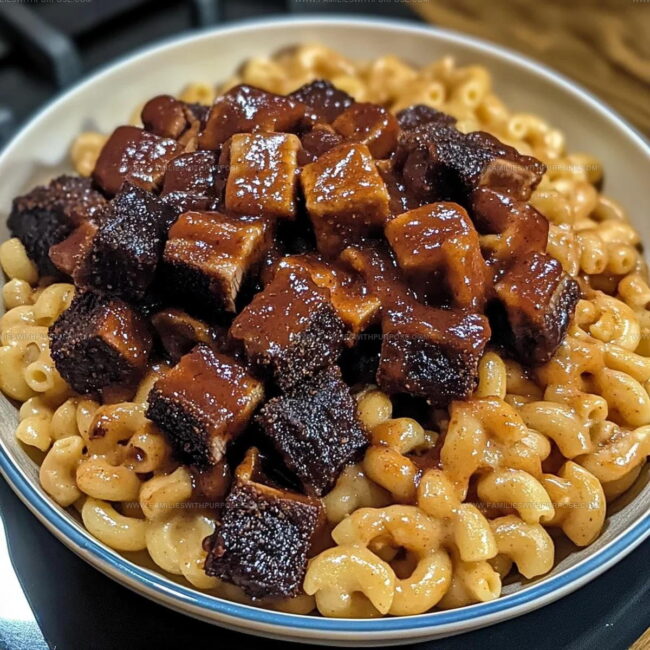
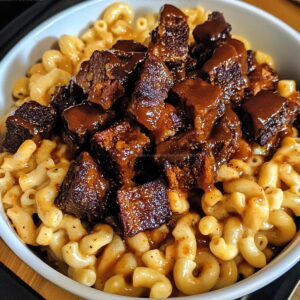
Dish out this Kansas City BBQ mac and cheese while it’s piping hot. The melted cheese and tender burnt ends make this a serious comfort meal.
Useful Kitchen Notes For Kansas City Bbq Mac Burnt Ends
Creative Variations For Kansas City BBQ Mac Burnt Ends
How To Serve Kansas City Bbq Mac Burnt Ends
Recommended Storage Method For Kansas City BBQ Mac Burnt Ends
Kansas City Bbq Mac Burnt Ends Questions About
Can I use a different cut of beef?
Brisket delivers the best texture and flavor for burnt ends, but chuck roast works as an alternative with similar results.
How spicy is the bbq rub?
The rub provides warmth without overwhelming heat, creating a balanced seasoning that enhances the meat’s natural taste.
What if my cheese sauce breaks?
Keep heat low and whisk constantly. Remove from stove momentarily if sauce starts separating, then slowly stir back together.
Do the burnt ends need to be crispy?
Aim for caramelized edges with tender interior – a mix of crusty exterior and soft meat creates perfect burnt ends texture.
Can this dish be prepared ahead of time?
Partially. Cook burnt ends and cheese sauce separately, then combine just before serving to maintain optimal texture and temperature.
What makes this mac and cheese different?
The smoky, caramelized beef burnt ends transform traditional mac and cheese into a rich, complex main dish with intense barbecue flavor.
Kansas City BBQ Mac Burnt Ends Recipe
- Total Time: 2 hours 40 minutes
- Yield: 6 1x
Description
Saucy Kansas City BBQ Mac Burnt Ends deliver pure comfort straight from the heartland’s kitchen. Tender beef cubes and creamy pasta mingle with smoky barbecue sauce, creating a classic Missouri-style meal your dinner guests will devour.
Ingredients
Protein:
- 2 lbs beef brisket
Main Ingredients:
- 1 lb elbow macaroni
- 2 cups shredded cheddar cheese
Supporting Ingredients:
- ¼ cup bbq rub
- 2 tablespoons olive oil
- ½ cup heavy cream
- ¼ cup butter
- 2 tablespoons dijon mustard
- 1 cup bbq sauce
- ½ cup chopped green onions
- 1 teaspoon salt
- ½ teaspoon black pepper
Instructions
- Trim your brisket’s excess fat and dice into precise 1-inch cubes for uniform cooking results.
- Generously massage bbq rub into each beef cube, ensuring total seasoning coverage.
- Warm 2 tbsp olive oil in a cast-iron skillet over medium-high heat at 375°F.
- Sear beef cubes for exactly 2-3 minutes per side, developing a deep golden crust.
- Transfer cubes to a baking sheet and slow roast at 275°F for 2-3 hours until meat becomes ultra-tender.
- Boil 1 lb elbow macaroni in salted water for 8-9 minutes until perfectly al dente.
- Melt ¼ cup butter in a large saucepan over medium heat at 325°F.
- Whisk ½ cup heavy cream into melted butter until smoothly combined.
- Gradually incorporate 2 cups shredded cheddar cheese, stirring until sauce becomes silky.
- Blend in 2 tbsp dijon mustard, 1 tsp salt, and ½ tsp black pepper into cheese mixture.
- Fold drained macaroni into cheese sauce, coating each noodle completely.
- Gently integrate roasted beef cubes throughout mac and cheese.
- Drizzle 1 cup bbq sauce across the top of the dish.
- Sprinkle ½ cup chopped green onions as a fresh finishing touch.
- Serve immediately while cheese remains luxuriously melted.
Notes
- Always trim brisket fat carefully to ensure uniform 1-inch cubes that cook evenly and develop consistent texture.
- Use a high-quality bbq rub with balanced spices to create a deep flavor crust on your burnt ends before searing.
- Cast-iron skillet provides the best sear for developing rich caramelization and locking in meat juices during initial cooking.
- For a lighter version, swap heavy cream with whole milk and use reduced-fat cheese, which will still deliver delicious results without compromising flavor complexity.
- Prep Time: 10 minutes
- Cook Time: 2 hours 30 minutes
- Category: Pan-Seared
- Method: Searing
- Cuisine: American
Nutrition
- Serving Size: 6
- Calories: 690 kcal
- Sugar: 10 g
- Sodium: 850 mg
- Fat: 42 g
- Saturated Fat: 19 g
- Unsaturated Fat: 20 g
- Trans Fat: 1 g
- Carbohydrates: 45 g
- Fiber: 2 g
- Protein: 38 g
- Cholesterol: 130 mg
Sophie Lane
Recipe Developer
Expertise
Family-friendly Meals, Simple Healthy Cooking, Ingredient Substitutions, Beginner-friendly Recipes, Flexible Meal Prep
Education
- Program: Professional Cook Certificate
- Focus: Online culinary training covering knife skills, cooking techniques, and plant-based and modern cooking approaches.
Schoolcraft CollegeSophie brings a calm and flexible approach to Families With Purpose. Based in Fort Collins, Colorado, she creates recipes that feel simple, clear, and easy to make at home. She focuses on family-friendly meals, healthy everyday cooking, ingredient swaps, and beginner-friendly ideas. Sophie helps make each recipe approachable and easy to follow, especially for busy families who need meals that can bend with the day.