
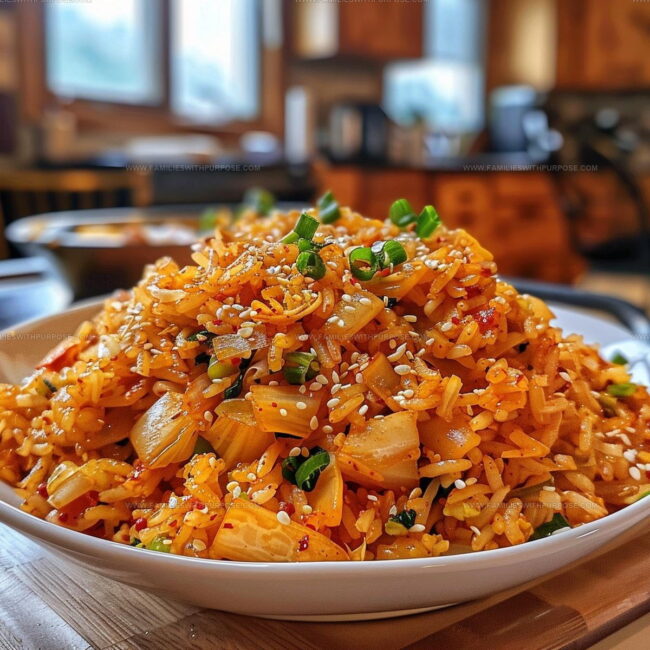
Kimchi Fried Rice (Kimchi Bokkeumbap) Recipe For Korean Comfort
Kimchi fried rice infuses together bold Korean flavors in a dish that satisfies any craving for something savory and comforting.
This popular meal has earned its place as a beloved staple across kitchens worldwide because it provides maximum flavor with minimal fuss.
Whether lunch or dinner calls, this dish answers with its hearty appeal and satisfying textures.
The beauty lies in how quickly everything comes together while still packing an authentic punch that makes every bite memorable.
Leftovers never tasted so good when transformed into something this delicious and warming.
Perfect for busy weeknights or lazy weekends, this Korean classic proves that simple can be absolutely spectacular.
Check out the full recipe below and start cooking up something truly special.
Bold Reasons to Love Kimchi Fried Rice
What Makes Kimchi Fried Rice Come Together
Main Ingredients:Vegetable Medley:Seasoning Blend:Equipment Behind a Flavorful Kimchi Fried Rice
Cooking Method for Classic Kimchi Fried Rice

Prep the Vegetables
Chop those veggies into neat little pieces so everything cooks evenly. You’ll want to have your cutting board ready with:
Keep everything close by for quick cooking.
Heat the Pan
Grab a large skillet and pour in 2 tablespoons sesame oil. Set your stove to medium-high heat (375°F) and let the oil get hot and slightly shimmery.
Sauté the Vegetables
Toss in your bell peppers and carrots. Cook them for exactly 3-4 minutes, stirring occasionally until they start to soften and look slightly glossy.
Add Kimchi
Drop in the chopped kimchi with its juices. Let everything sizzle together for 2-3 minutes, which helps blend those amazing flavors.
Introduce the Rice
Dump in 3 cups of day-old rice. Break up any clumps with your spatula and mix everything thoroughly. Let the rice fry for about 4-5 minutes until it gets slightly crispy edges.
Scramble the Eggs
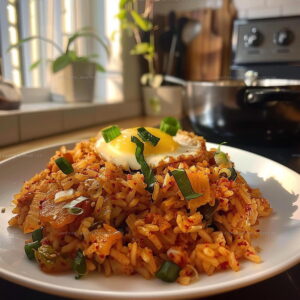
Push the rice to one side of the pan. Crack 2 large eggs directly into the empty space. Scramble them quickly, then fold into the rice mixture.
Season and Finish
Drizzle 3 tablespoons low-sodium soy sauce and 1 tablespoon gochujang over everything. Stir well to make sure each grain gets coated with those delicious sauces.
Final Touch
If you’re using protein, add 1/2 cup cubed pork belly or tofu now. Give everything a final quick stir and serve hot.
Cooking Advice for Kimchi Fried Rice
Flavor Changes for Kimchi Fried Rice
How to Serve Kimchi Fried Rice Properly
How to Store Kimchi Fried Rice Safely
Kimchi Fried Rice (Bokkeumbap): What Cooks Ask Most
Can I use fresh or leftover rice?
Cold leftover rice works best because it’s drier and creates crispier fried rice. Fresh hot rice will make your dish mushy and sticky.
What if I don’t have gochujang?
Traditional gochujang provides unique flavor, but you can substitute with sriracha or red pepper flakes for heat. The taste will be slightly different.
Are there vegetarian options for this recipe?
Absolutely! Simply skip the eggs or replace them with tofu for a plant-based protein alternative. The kimchi adds fantastic depth and texture.
How spicy is kimchi fried rice?
Kimchi naturally brings moderate heat. Select mild kimchi if you prefer less spice, or choose extra fermented kimchi for more intense flavor.
Can I make this dish ahead of time?
Kimchi fried rice tastes best fresh but can be refrigerated for 1-2 days. Reheat in a skillet to restore crispiness and prevent soggy texture.
Which type of kimchi works best?
Napa cabbage kimchi is traditional and recommended. Radish kimchi can work too, but the flavor profile will change slightly.
Kimchi Fried Rice (Kimchi Bokkeumbap) Recipe
- Total Time: 20-22 minutes
- Yield: 3 1x
Description
Korean Kimchi Bokkeumbap brings leftover rice and tangy kimchi together in a quick, satisfying meal that sparks comfort and flavor in just minutes. Spicy, savory goodness comes together effortlessly when your kitchen becomes a canvas for this classic Korean comfort dish.
Ingredients
Main Ingredients:
- 3 cups rice
- 1 cup kimchi
- ½ cup pork belly or tofu
- 2 large eggs
Supporting Ingredients:
- ½ cup bell peppers
- ½ cup carrots
- ½ cup peas
- 3 green onions
Seasoning Ingredients:
- 2 tablespoons sesame oil
- 3 tablespoons low-sodium soy sauce
- 1 tablespoon gochujang
Instructions
- Chop 1 cup kimchi, ½ cup bell peppers, ½ cup carrots, and 3 green onions into precise bite-sized pieces. Ensure your day-old rice is ready at room temperature.
- Warm 2 tablespoons sesame oil in a large skillet over medium-high heat (375°F) until the surface looks slightly shimmery and fragrant.
- Toss ½ cup bell peppers and ½ cup carrots into the hot skillet. Sauté for exactly 3-4 minutes, stirring constantly until vegetables soften but retain a gentle crunch.
- Add chopped kimchi and its natural juices to the skillet. Cook for 2-3 minutes, allowing the flavors to meld and intensify.
- Introduce 3 cups of day-old rice into the skillet. Break apart any rice clumps using your spatula. Fry for 4-5 minutes until rice develops golden-brown crispy edges.
- Create a small clearing in the rice. Crack 2 large eggs directly into the open space. Scramble eggs quickly, then fold them thoroughly into the rice mixture.
- Drizzle 3 tablespoons low-sodium soy sauce and 1 tablespoon gochujang across the skillet. Mix vigorously to ensure every grain becomes evenly coated with spicy, savory sauce.
- Optional: Incorporate ½ cup cubed pork belly or tofu during the final minute of cooking for extra protein.
- Transfer your fragrant kimchi fried rice to serving plates. Garnish with chopped green onions for a fresh, bright finish.
Notes
- Use day-old rice for the best texture and prevent soggy fried rice that clumps together.
- Choose well-fermented kimchi for deeper, tangier flavor that adds complexity to your dish.
- Adjust spice levels by controlling the amount of gochujang or using a milder version for sensitive palates.
- For a protein boost, add diced tofu, cooked chicken, or shrimp to make the dish more substantial.
- Prep Time: 10 minutes
- Cook Time: 10-12 minutes
- Category: Stir-Fried
- Method: Sautéing
- Cuisine: Korean
Nutrition
- Serving Size: 3
- Calories: 343 kcal
- Sugar: 3 g
- Sodium: 780 mg
- Fat: 18 g
- Saturated Fat: 4.5 g
- Unsaturated Fat: 12.5 g
- Trans Fat: 0 g
- Carbohydrates: 32 g
- Fiber: 3 g
- Protein: 14 g
- Cholesterol: 110 mg
Mason Carter
Founder
Expertise
Family Meal Routines, Simple One-pot Meals, Budget-friendly Cooking, Quick Dinner Planning, Batch Cooking Systems
Education
- Certificate: Culinary Arts
- Focus: Training in core cooking techniques, kitchen operations, and real food preparation through hands-on experience in professional-style kitchens.
Penn Foster Career School (Online)Mason is the founder of Families With Purpose and the heart behind its simple, family-focused recipes. Based in Greenville, South Carolina, he creates meals that fit into busy routines and bring people back to the table. He focuses on easy dinners, one-pot meals, budget-friendly cooking, and practical weekly meal planning. Mason has built a recipe collection shaped by real family life, with clear methods and repeatable meals that work on everyday schedules.