Crispy Honey Glazed Chicken Recipe That Makes Dinner Special
Honey glazed chicken recipe enthusiasts know that golden, glossy poultry never fails to win over a crowd at dinner time.
Sweet meets savory in a combination that feels both comforting and special enough for any occasion.
Busy weeknights become manageable when a simple glaze does all the work of delivering bold flavor.
The balance between sweet notes and subtle depth creates a dish that appeals to picky eaters and adventurous palates alike.
Minimal prep time means more moments spent around the table instead of hovering over the stove.
Leftovers rarely survive until morning because everyone reaches for seconds while the pan is still warm.
Versatile enough for casual family meals or impressive enough when company drops by unexpectedly, this becomes a go-to option that never disappoints.
Why Honey Glazed Chicken Works for Any Night
What You’ll Need for Honey Glazed Chicken
Main Protein:Seasoning Blend:Glaze Ingredients:Supporting Flavor Enhancers:Cooking Support:Garnish:Tools to Prepare Honey Glazed Chicken
Cooking Directions for Honey Glazed Chicken
Prep the Chicken
Grab your 4 chicken breasts and make sure they’re about the same thickness. Gently tap them with a meat mallet until they’re roughly half an inch thick. This helps them cook evenly.
Season Like a Pro
Mix 1 teaspoon salt, 1/2 teaspoon black pepper, 1/2 teaspoon garlic powder, and 1/4 teaspoon paprika in a small bowl. Sprinkle this magical mix all over both sides of your chicken.
Create the Glaze
Grab another small bowl and whisk together these tasty ingredients:
Simmer the Sauce
Put your glaze mixture in a saucepan over medium heat. Let it bubble gently for 5-7 minutes, stirring now and then until it starts to thicken up.
Heat the Pan
Pour 1 tablespoon olive oil into a large skillet. Crank the heat to medium-high and let it get nice and hot.
Sear the Chicken
Carefully place your seasoned chicken breasts in the hot pan. Give each piece some breathing room – cook in batches if needed. Sear for 4-5 minutes on each side until they’re beautifully golden brown.
Glaze Time
Turn the heat down to medium-low. Pour that delicious honey glaze over the chicken, making sure each piece gets a good coating.
Final Cooking
Let the chicken simmer in the glaze for another 5-7 minutes. Flip them occasionally to get that sticky, glossy finish. Check that the internal temperature hits 165F to ensure it’s fully cooked.
Prevent Burning
If the glaze starts to brown too quickly, splash in a couple tablespoons of water and cover the pan to help the chicken finish cooking.
Rest and Serve
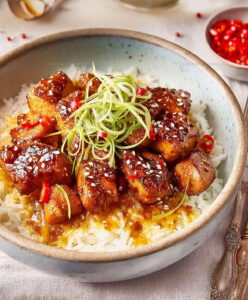
Pull the chicken out of the pan and let it rest for a few minutes. Slice it up and get ready to enjoy! Sprinkle some sesame seeds and chopped green onions on top if you’re feeling fancy.
Which Tips Lock In Honey Glazed Chicken Juiciness
Sticky Honey Glazed Chicken Variations to Try
Best Ways to Serve Honey Glazed Chicken
How to Store Honey Glazed Chicken Juicy?
Honey Glazed Chicken FAQs
Can I use chicken thighs instead of breasts?
Absolutely! Chicken thighs work great and often stay more juicy. Just adjust cooking time since thighs might take slightly longer to cook through.
How spicy does this glaze get?
The red pepper flakes add a mild kick. If heat worries you, skip them completely or reduce the amount to control the spice level.
What if I dont have rice vinegar?
Regular white vinegar makes an excellent substitute. Apple cider vinegar also works perfectly in this recipe.
Is there a way to make this glaze lower in sugar?
Replace some honey with sugar-free maple syrup or use a low-sugar honey alternative. The flavor profile will remain similar.
Can I prepare the glaze ahead of time?
Definitely! Mix the glaze ingredients and store in the refrigerator up to two days before cooking. Just reheat gently before using.
Does the chicken need to marinate before cooking?
No marinating required. The seasoning and glaze provide plenty of flavor during the quick cooking process.
Savory Skillet Honey Glazed Chicken Recipe
- Total Time: 30-34 minutes
- Yield: 4 1x
Description
Honey Glazed Chicken brings together sweet and savory flavors that make your dinner table sparkle with excitement. Seared chicken breasts coated in a golden glaze will have your family asking for seconds before the first bite is finished.
Ingredients
Main Ingredients:
- 4 chicken breasts, boneless and skinless
Seasonings and Spices:
- 1 teaspoon salt
- ½ teaspoon black pepper
- ½ teaspoon garlic powder
- ¼ teaspoon paprika
- ¼ teaspoon red pepper flakes
Glaze and Sauce:
- ¼ cup honey
- 2 tablespoons soy sauce
- 1 tablespoon rice vinegar
- 1 tablespoon ketchup
- 1 tablespoon olive oil
- 1 tablespoon water
- 1 teaspoon Dijon mustard
- ½ teaspoon ginger
- 1 clove garlic
Garnish:
- Sesame seeds
- Chopped green onions
Instructions
- Pound each chicken breast to an even ½-inch thickness using a meat mallet between plastic wrap sheets.
- Mix 1 teaspoon salt, ½ teaspoon black pepper, ½ teaspoon garlic powder, and ¼ teaspoon paprika in a small bowl. Sprinkle this seasoning blend evenly across both sides of your chicken breasts.
- Create the glaze by whisking ¼ cup honey, 2 tablespoons soy sauce, 1 tablespoon rice vinegar, 1 tablespoon ketchup, 1 teaspoon Dijon mustard, 1 minced garlic clove, and ½ teaspoon grated ginger in a saucepan.
- Simmer the glaze over medium heat for 5-7 minutes, stirring occasionally until it slightly thickens. Add a tablespoon of water if the mixture becomes too dense.
- Heat 1 tablespoon olive oil in a large skillet over medium-high heat until it shimmers and feels hot.
- Place seasoned chicken breasts into the hot skillet, ensuring they are not overcrowded. Sear for 4-5 minutes on each side until golden brown.
- Reduce heat to medium-low and pour the entire honey glaze over the chicken, coating each breast thoroughly.
- Continue cooking for 5-7 minutes, turning chicken occasionally, until the internal temperature reaches 165°F and the glaze becomes sticky and caramelized.
- If glaze browns too quickly, add 2 tablespoons water and cover the skillet with a lid to help steam and finish cooking the chicken.
- Remove chicken from the skillet and let it rest for 3-4 minutes before slicing against the grain.
- Plate the sliced chicken and sprinkle with 1 teaspoon sesame seeds and chopped green onions for a fresh garnish.
Notes
- Chicken thickness matters for even cooking, so take time to pound breasts to a consistent 1/2-inch before seasoning.
- Fresh ginger provides a brighter flavor compared to ground ginger, but both work well in the recipe.
- For gluten-free adaptation, replace soy sauce with tamari or coconut aminos to maintain the umami depth.
- Letting the chicken rest after cooking allows juices to redistribute, ensuring each bite stays moist and tender.
- Prep Time: 10 minutes
- Cook Time: 20-24 minutes
- Category: Sautéed
- Method: Sautéing
- Cuisine: American
Nutrition
- Serving Size: 4
- Calories: 280 kcal
- Sugar: 16 g
- Sodium: 580 mg
- Fat: 7 g
- Saturated Fat: 1 g
- Unsaturated Fat: 6 g
- Trans Fat: 0 g
- Carbohydrates: 21 g
- Fiber: 0.5 g
- Protein: 32 g
- Cholesterol: 85 mg
Mason Carter
Founder
Expertise
Family Meal Routines, Simple One-pot Meals, Budget-friendly Cooking, Quick Dinner Planning, Batch Cooking Systems
Education
- Certificate: Culinary Arts
- Focus: Training in core cooking techniques, kitchen operations, and real food preparation through hands-on experience in professional-style kitchens.
Penn Foster Career School (Online)Mason is the founder of Families With Purpose and the heart behind its simple, family-focused recipes. Based in Greenville, South Carolina, he creates meals that fit into busy routines and bring people back to the table. He focuses on easy dinners, one-pot meals, budget-friendly cooking, and practical weekly meal planning. Mason has built a recipe collection shaped by real family life, with clear methods and repeatable meals that work on everyday schedules.