
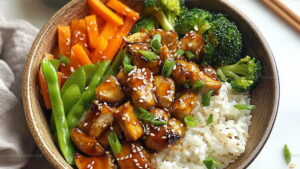
Teriyaki Chicken Recipe with Sticky Savory Glaze
Savory teriyaki chicken recipe dishes have become a weeknight favorite in kitchens around the world because they deliver bold flavor with minimal fuss.
This meal brings comfort and satisfaction to the table every single time, making it perfect for busy evenings when hunger strikes hard.
The sweet and salty profile appeals to nearly everyone, from picky eaters to adventurous food lovers who crave something hearty.
Plus, it pairs beautifully with rice, noodles, or fresh vegetables for a complete dinner.
The glossy coating and tender meat create an appealing presentation that looks impressive without requiring fancy techniques.
Honestly, once you taste that rich, umami-packed sauce clinging to each bite, it becomes clear why this dish has earned such widespread popularity.
Best of all, the entire meal comes together faster than ordering takeout.
Ready to make this restaurant favorite right in the comfort of home?
Best Reasons to Try Homemade Teriyaki Chicken
What Builds The Bold Teriyaki Chicken Flavor
Main Protein:Cooking Fat:Seasoning Basics:Sauce Liquid Base:Sauce Sweeteners:Sauce Flavor Enhancers:Sauce Thickener:Kitchen Items That Support Searing, Simmering, And Glazing
Step-by-Step Guide to Homemade Teriyaki Chicken

Prep the Chicken
Pat 1.5 pounds (680 grams) boneless, skinless chicken thighs dry with paper towels. Sprinkle a pinch of salt and pepper over the chicken pieces to enhance their flavor.
Brown the Chicken
Heat 1 tablespoon olive oil in a large skillet at 375°F (190°C). Carefully place chicken pieces in a single layer. Cook for 5-7 minutes, stirring occasionally, until the chicken turns golden brown and reaches an internal temperature of 165°F (74°C).
Create Teriyaki Sauce
Whisk together the sauce ingredients in a separate bowl:
Combine Chicken and Sauce
Pour the teriyaki sauce over the browned chicken in the skillet. Stir to coat every piece completely.
Thicken the Sauce
Create a cornstarch slurry by mixing:
Stir the slurry into the skillet and simmer for 3-5 minutes at medium heat. The sauce will gradually thicken and become glossy.
Rest and Serve
Remove the skillet from heat. Let the chicken rest for 2 minutes so the sauce can settle and coat each piece evenly. Serve hot over steamed rice or your favorite side dish.
Small Upgrades For Better Caramelization Or Tang
Creative Teriyaki Chicken Variations
Plating Ideas For A Teriyaki Chicken Meal
Keeping Teriyaki Chicken Juicy After Cooking
Teriyaki Chicken Questions For Home Cooks
Can teriyaki chicken be made with other proteins?
Absolutely! While chicken works wonderfully, beef, pork, tofu, or shrimp can be substituted with similar techniques. Each protein brings its own delicious character to the teriyaki sauce.
What if fresh ginger is unavailable?
Ground ginger works as a substitute. Use about 1/2 teaspoon instead of fresh minced ginger. The flavor profile changes slightly, but it still delivers a tasty result.
Is cornstarch necessary for the sauce?
Cornstarch helps thicken the sauce and create that glossy, restaurant-style finish. Without it, the sauce remains thinner and less clingy to the protein.
How spicy is this teriyaki sauce?
This recipe creates a classic, mild teriyaki sauce. For heat lovers, we recommend adding red pepper flakes or sriracha to customize the spice level.
Can teriyaki sauce be prepared ahead of time?
Definitely! The sauce keeps well in the refrigerator for 5-7 days. Make it in advance and store in an airtight container to save time during meal preparation.
Savory Teriyaki Chicken Recipe
- Total Time: 1 hour 42 minutes
- Yield: 4 1x
Description
Teriyaki chicken coats tender pieces in a sweet and savory glaze. The result is a comforting dish that feels restaurant-worthy at home.
Ingredients
Main Protein:
- 1.5 pounds boneless, skinless chicken thighs (or breasts)
Sauce and Seasonings:
- ½ cup low-sodium soy sauce
- ¼ cup water
- ¼ cup packed brown sugar
- 1 tablespoon honey
- 1 tablespoon rice vinegar
- 2 cloves garlic
- 1 teaspoon fresh grated ginger (or ½ teaspoon ground ginger)
Cooking and Thickening:
- 1 tablespoon olive oil (or vegetable oil)
- Salt
- Pepper
- 2 teaspoons cornstarch
- 2 tablespoons cold water
Instructions
- Select 1.5 pounds boneless, skinless chicken thighs and slice into bite-sized pieces. Use paper towels to thoroughly dry each piece, which helps achieve perfect browning.
- Season chicken fragments with a pinch of salt and pepper, ensuring even coverage across all surfaces.
- Heat 1 tablespoon olive oil in a large skillet at medium-high temperature (375°F). Arrange chicken pieces in a single layer without overcrowding.
- Cook chicken for 5-7 minutes, rotating occasionally, until exterior turns golden brown and internal temperature reaches 165°F. Complete in batches if necessary.
- Combine ½ cup low-sodium soy sauce, ¼ cup water, ¼ cup brown sugar, 1 tablespoon honey, 1 tablespoon rice vinegar, 2 minced garlic cloves, and 1 teaspoon fresh grated ginger in a mixing bowl.
- Reduce skillet heat to medium after chicken finishes cooking. Pour entire sauce mixture over browned chicken pieces.
- Whisk 2 teaspoons cornstarch with 2 tablespoons cold water to create a smooth slurry.
- Pour cornstarch mixture into skillet and stir continuously for 3-5 minutes until sauce transforms into a glossy, thickened consistency.
- Remove skillet from heat and allow chicken to rest for 2 minutes, enabling sauce to settle and coat each piece evenly.
Notes
- Drying chicken thoroughly before cooking helps create a beautiful golden-brown exterior that seals in juicy flavor.
- Using a heavy-bottomed skillet ensures even heat distribution and prevents burning while developing rich caramelization on the chicken.
- Creating the cornstarch slurry with cold water prevents lumps and helps thicken the sauce smoothly without clumping.
- For a gluten-free version, swap regular soy sauce with tamari and ensure all other ingredients are certified gluten-free.
- Prep Time: 10 minutes
- Cook Time: 1 hour 32 minutes
- Category: Sautéed
- Method: Sautéing
- Cuisine: Japanese
Nutrition
- Serving Size: 4
- Calories: 222 kcal
- Sugar: 10 g
- Sodium: 450 mg
- Fat: 8 g
- Saturated Fat: 2 g
- Unsaturated Fat: 6 g
- Trans Fat: 0 g
- Carbohydrates: 12 g
- Fiber: 0.5 g
- Protein: 27 g
- Cholesterol: 85 mg
Mason Carter
Founder
Expertise
Family Meal Routines, Simple One-pot Meals, Budget-friendly Cooking, Quick Dinner Planning, Batch Cooking Systems
Education
- Certificate: Culinary Arts
- Focus: Training in core cooking techniques, kitchen operations, and real food preparation through hands-on experience in professional-style kitchens.
Penn Foster Career School (Online)Mason is the founder of Families With Purpose and the heart behind its simple, family-focused recipes. Based in Greenville, South Carolina, he creates meals that fit into busy routines and bring people back to the table. He focuses on easy dinners, one-pot meals, budget-friendly cooking, and practical weekly meal planning. Mason has built a recipe collection shaped by real family life, with clear methods and repeatable meals that work on everyday schedules.